> ## Documentation Index
> Fetch the complete documentation index at: https://resources.begenuin.com/llms.txt
> Use this file to discover all available pages before exploring further.
# iOS SDK 2.0
> Genuin iOS SDK comprises features such as brand feed, communities, and groups.
| SDK | Description |
| ------------ | ------------------------------------------------------------------------------------------------- |
| GenuinCore | Includes the core functionality of the Genuin Ecosystem: Embeds and User authentication. |
| GenuinUI | Additional UI flows like comments, search, deep-links, notifications, group/community detail etc. |
| GenuinCamera | Camera flows for video content creation. |
| GenuinAI | Additional flows for AI assisted community/group creation. |
## Requirements
| Platform | Minimum Deployment Target | Language | Supported Orientations | Supported Destinations |
| -------- | ------------------------- | -------- | ---------------------- | ---------------------- |
| iOS | 13.0 | Swift | Portrait | iPhone |
## Permissions (Optional)
Permissions to be added in `info.plist` file of your application
| Permission | Usage | Used Where | In SDK |
| -------------------------------------------------------- | --------------------------------------------------------------------------------------------------------------------------------------- | ------------------------------------------------- | ------------ |
| Camera (NSCameraUsageDescription) | Genuin needs permissions to open your camera and microphone. This allows Genuin to record videos that can be shared with other people. | Post, Video Comment | GenuinCamera |
| Microphone (NSMicrophoneUsageDescription) | Genuin needs permissions to open your camera and microphone. This allows Genuin to record videos that can be shared with other people. | Post, Voice Comment | GenuinCamera |
| Photos (NSPhotoLibraryUsageDescription) | Genuin needs permissions to access your photo library. This allows Genuin to download videos to your phone and save it to your library. | Post, Profile, Banner | GenuinCore |
| Speech Recognition (NSSpeechRecognitionUsageDescription) | The transcript of your recording will be displayed to you in the end for you to overlay it on the audio message. | To generate transcript from recorded audio | GenuinCamera |
| Contacts (NSContactsUsageDescription) | Genuin requires to sync with your contacts and provide a better experience when you wish to share your posts with them. | Add Members in Communities and Groups | GenuinUI |
| Location (NSLocationWhenInUseUsageDescription) | Your precise location will help us suggest your community details more accurately. | AI Powered Communities based on the User Location | GenuinCore |
| Tracking (NSUserTrackingUsageDescription) | Your data will be used to analyse ads we run! | Monetization | GenuinCore |
If any permission is not given then that particular feature will not be accessible in your app.
## Installation
### Using Swift Package Manager (SPM)
To add Genuin SDK to your iOS project via Swift Package Manager:
**1. In Xcode, go to:**
File > Swift Packages > Add Package Dependency
**2. When prompted, enter the Genuin SDK repository URL:**
```swift Repository URL theme={null}
https://github.com/genuininc/genuin_ios_sdk
```
**3. Choose the version:**
```swift Version theme={null}
Version: 2.1.1
```
**Note:** Make sure all Genuin SDK modules are added with the same version (2.1.1) for compatibility.
**Module Dependency Structure**
The Genuin SDK is composed of multiple interdependent modules. These follow a linear dependency chain as outlined below:
```
ai ← camera ← ui ← core
```
**Integration Rules**
1. core - Can be used independently. It is the foundation for all other modules.
2. ui - Requires core. Must be added together.
3. camera - Requires both core and ui.
4. ai - Requires camera, ui, and core.
Ensure modules are added in the correct order and with the same version to avoid conflicts during build and runtime.
### Using Cocoapods
If your project doesn't have the CocoaPods setup then start with `pod init` which will create the Podfile, else do following changes in the pod file to install GenuinSDK.
```swift In Podfile theme={null}
platform :ios, '13.0'
target 'YourProject' do
use_frameworks!
# Pods for YourProject
genuin_sdk_version = '2.1.1'
pod "GenuinCore", :git => "https://github.com/genuininc/genuin_ios_sdk.git", :tag => genuin_sdk_version
pod "GenuinUI", :git => "https://github.com/genuininc/genuin_ios_sdk.git", :tag => genuin_sdk_version
pod "GenuinCamera", :git => "https://github.com/genuininc/genuin_ios_sdk.git", :tag => genuin_sdk_version
pod "GenuinAI", :git => "https://github.com/genuininc/genuin_ios_sdk.git", :tag => genuin_sdk_version
end
post_install do |installer|
installer.pods_project.targets.each do |target|
if target.name == 'Giphy'
`xcrun -sdk iphoneos bitcode_strip -r Pods/Giphy/GiphySDK/GiphyUISDK.xcframework/ios-arm64_armv7/GiphyUISDK.framework/GiphyUISDK -o Pods/Giphy/GiphySDK/GiphyUISDK.xcframework/ios-arm64_armv7/GiphyUISDK.framework/GiphyUISDK`
end
target.build_configurations.each do |config|
config.build_settings['IPHONEOS_DEPLOYMENT_TARGET'] = '13.0'
config.build_settings['BUILD_LIBRARY_FOR_DISTRIBUTION'] = 'YES'
end
end
end
```
**a. For Core SDK:**
```swift In Podfile theme={null}
pod "GenuinCore", :git => "https://github.com/genuininc/genuin_ios_sdk.git", :tag => genuin_sdk_version
```
**b. For UI SDK:**
```swift In Podfile theme={null}
pod "GenuinUI", :git => "https://github.com/genuininc/genuin_ios_sdk.git", :tag => genuin_sdk_version
```
**c. For Camera SDK:**
```swift In Podfile theme={null}
pod "GenuinCamera", :git => "https://github.com/genuininc/genuin_ios_sdk.git", :tag => genuin_sdk_version
```
**d. For AI SDK:**
```swift In Podfile theme={null}
pod "GenuinAI", :git => "https://github.com/genuininc/genuin_ios_sdk.git", :tag => genuin_sdk_version
```
**Example**
Import the GenuinSDK module in your `SceneDelegate/AppDelegate`.
```swift SceneDelegate.swift theme={null}
import GenuinCore
func scene(_ scene: UIScene, willConnectTo session: UISceneSession, options connectionOptions: UIScene.ConnectionOptions) {
// Optional configuration and attaching the UIWindow to UIWindowScene
guard let _ = (scene as? UIWindowScene) else { return }
// Initialize the SDK configuration
let configuration = GenuinConfiguration.shared
// For Production environment (Default)
configuration.setCustomLoader("YOUR_LOADER", bundle: .main)
// For QA Environment
configuration.environment = .qa
// Initialize the SDK with your API key and configuration
GenuinSDK.shared.initialize(apiKey: "YOUR_API_KEY", configuration: configuration)
// Notify the SDK that the scene will connect
GenuinSDK.shared.scene(scene, willConnectTo: session, options: connectionOptions)
}
```
```swift AppDelegate.swift theme={null}
import GenuinCore
func application(_ application: UIApplication, didFinishLaunchingWithOptions launchOptions: [UIApplication.LaunchOptionsKey: Any]?) -> Bool {
// Initialize the SDK configuration
let configuration = GenuinConfiguration.shared
// For Production Environment (Default)
configuration.setCustomLoader("YOUR_LOADER", bundle: .main)
// For QA Environment
configuration.environment = .qa
// Initialize the SDK with your API key and configuration
GenuinSDK.shared.initialize(apiKey: "YOUR_API_KEY", configuration: configuration)
return true
}
```
Cocoapods (with all sdk initialize)
```swift theme={null}
GenuinUI.shared.initialize() //Initialize method is required if GenuinUI sdk is integrated
GenuinCamera.shared.initialize() //Initialize method is required if GenuinCamera sdk is integrated
GenuinAI.shared.initialize() //Initialize method is required if GenuinAI sdk is integrated
GenuinSDK.shared.initialize(apiKey: "YOUR_API_KEY", configuration: configuration)
```
To load your lottie animation accross the Genuin SDK, you can add it here `configuration.setCustomLoader("YOUR_LOADER", bundle: .main)`
### Instructions for `SceneDelegate`:
1. Ensure you are using the `UISceneDelegate` in your app.
2. In your `SceneDelegate.swift` file, implement the `scene(_:willConnectTo:options:)` method.
3. Use the shared configuration and set up any custom loaders or additional parameters.
4. Call `GenuinSDK.shared.initialize(apiKey: "YOUR_API_KEY", configuration: configuration)` with your API key and the configured options.
5. Ensure that `GenuinSDK.shared.scene(scene, willConnectTo: session, options: connectionOptions)` is called to notify the SDK of the scene connection.
### Instructions for `AppDelegate`:
1. In your `AppDelegate.swift`, implement the `application(_:didFinishLaunchingWithOptions:)` method.
2. Set up the shared configuration and initialize the SDK with your API key.
3. Call `GenuinSDK.shared.initialize(apiKey: "YOUR_API_KEY", configuration: configuration)` with your API key and the configured options.
4. Return `true` to indicate successful launch configuration.
```swift In SceneDelegate.swift theme={null}
import GenuinCore
import GenuinUI
import GenuinCamera
import GenuinAI
func scene(_ scene: UIScene, willConnectTo session: UISceneSession, options connectionOptions: UIScene.ConnectionOptions) {
// Optional configuration and attaching the UIWindow to UIWindowScene
guard let _ = (scene as? UIWindowScene) else { return }
// Initialize the SDK configuration
let configuration = GenuinConfiguration.shared
// For Production environment (Default)
configuration.setCustomLoader("YOUR_LOADER", bundle: .main)
// For QA Environment
configuration.environment = .qa
GenuinUI.shared.initialize() //Initialize method is required if GenuinUI sdk is integrated
GenuinCamera.shared.initialize() //Initialize method is required if GenuinCamera sdk is integrated
GenuinAI.shared.initialize() //Initialize method is required if GenuinAI sdk is integrated
// Initialize the SDK with your API key and configuration
GenuinSDK.shared.initialize(apiKey: "YOUR_API_KEY", configuration: configuration)
}
```
```swift In AppDelegate.swift theme={null}
import GenuinCore
import GenuinUI
import GenuinCamera
import GenuinAI
func application(_ application: UIApplication, didFinishLaunchingWithOptions launchOptions: [UIApplication.LaunchOptionsKey: Any]?) -> Bool {
// Initialize the SDK configuration
let configuration = GenuinConfiguration.shared
// For Production Environment (Default)
configuration.setCustomLoader("YOUR_LOADER", bundle: .main)
// For QA Environment
configuration.environment = .qa
GenuinUI.shared.initialize() //Initialize method is required if GenuinUI sdk is integrated
GenuinCamera.shared.initialize() //Initialize method is required if GenuinCamera sdk is integrated
GenuinAI.shared.initialize() //Initialize method is required if GenuinAI sdk is integrated
// Initialize the SDK with your API key and configuration
GenuinSDK.shared.initialize(apiKey: "YOUR_API_KEY", configuration: configuration)
return true
}
```
### Instructions for `SwiftUI`:
In your SwiftUI’s App file initialize the GenuinSDK as follows:
```swift theme={null}
import SwiftUI
import GenuinCore
import GenuinUI
import GenuinAI
import GenuinCamera
@main
struct GenuinSwiftUIApp: App {
init() {
let configuration = GenuinConfiguration()
// For QA Environment
configuration.environment = .qa
configuration.setCustomLoader("YOUR_LOADER", bundle: Bundle.main)
GenuinUI.shared.initialize()
GenuinCamera.shared.initialize()
GenuinAI.shared.initialize()
GenuinSDK.shared.initialize(apiKey: "YOUR_API_KEY", configuration: configuration)
}
var body: some Scene {
WindowGroup {
ContentView()
}
}
}
```
**Note**: Our SDK is well optimized for `iOS version 15.0` and above, but if you are using `iOS version 13` or `14` then put this `if #available(iOS 15.0, *)` condition while importing the GenuinSDK.
## Monetization
To enable Monetization use following code snippet to get **advertisingIdentifier** by **AppTrackingTranspancy**. You need to add `NSUserTrackingUsageDescription` in `Info.plist` as described [here](https://resources.begenuin.com/developers/sdk-docs/ios_sdk#permissions-optional).
```swift For SceneDelegate theme={null}
import AppTrackingTransparency
import AdSupport //Import only if you want to use advertisingIdentifier
class SceneDelegate: UIResponder, UIWindowSceneDelegate {
func sceneDidBecomeActive(_ scene: UIScene) {
// Called when the scene has moved from an inactive state to an active state.
// Use this method to restart any tasks that were paused (or not yet started) when the scene was inactive.
DispatchQueue.main.async {
ATTrackingManager.requestTrackingAuthorization { status in
switch status {
case .notDetermined:
break
case .restricted:
break
case .denied:
break
case .authorized:
// If you want to check the current advertisingIdentifier
print("advertisingIdentifier: ", ASIdentifierManager.shared().advertisingIdentifier.uuidString)
break
@unknown default:
break
}
}
}
}
}
```
```swift For AppDelegate theme={null}
import AppTrackingTransparency
import AdSupport //Import only if you want to use advertisingIdentifier
class AppDelegate: UIResponder, UIApplicationDelegate {
func applicationDidBecomeActive(_ application: UIApplication) {
DispatchQueue.main.async {
ATTrackingManager.requestTrackingAuthorization { status in
switch status {
case .notDetermined:
break
case .restricted:
break
case .denied:
break
case .authorized:
// If you want to check the current advertisingIdentifier
print("advertisingIdentifier: ", ASIdentifierManager.shared().advertisingIdentifier.uuidString)
break
@unknown default:
break
}
}
}
}
}
```
Also if you enable monetization then you need to update App Privacy in AppStoreConnect
**Need to declare in App Store Connect that your app is using Advertising Data**
Steps:
* **Log in** to your App Store Connect.
* **Select the app** you are working on.
* Go to App **Privacy > Data Collection**.
* Find the Usage Data section and select the **Advertising Data**.
* Click on **Save/Publish**.
* Now Setup Advertising Data by selecting (Third-Party Advertising, Analytics, Product Personalization, App Functionality, Other Purposes)
* Click on **Next** and give the answers as asked.
* Click on **save**.
## Embed with Swift
**Note**: Make sure you have followed the [installation steps](https://resources.begenuin.com/developers/sdk-docs/ios_sdk#installation) in order to implement the Carousel Embed.
**Note**: In order to migrate from GenuinSDK 1.0 to 2.0, you need to replace `import GenuinSDK` to `import GenuinCore` in your codebase.
### Carousel Embed
Refer to [Carousel View](https://resources.begenuin.com/developers/guides/embed#mobile-view) in Mobile
We have introduced new attribute `GenuinEmbedAttributes` that holds all the required data attributes needed to create and initialize an embed.
You can initialize it with the following parameters:
```swift ViewController.swift theme={null}
init(
embedId: String,
uniqueId: String? = nil,
viewController: UIViewController,
ssoToken: String? = nil,
params: [String: Any]? = nil,
contextualParams: [String: Any]? = nil,
embedConfiguration: EmbedConfiguration = EmbedConfiguration()
)
```
Parameters
* `embedId: String` – The identifier for the embed.
* `uniqueId: String?` (optional) – A unique identifier, if needed.
* `viewController: UIViewController` – The parent view controller for presenting the embed.
* `ssoToken: String?` (optional) – Single Sign-On token for authentication.
* `params: [String: Any]?` (optional) – Additional parameters for customization.
* `contextualParams: [String: Any]?` (optional) – Context-specific parameters for the embed.
* `embedConfiguration: EmbedConfiguration` (optional) – Configuration object for customizing embed behavior. Defaults to a new EmbedConfiguration instance.
Creating and Loading an Embed
You can create and load a GenuinEmbedView in following ways:
#### Approach 01
```swift ViewController.swift (With SSO) theme={null}
let embedConfiguration = EmbedConfiguration()
embedConfiguration.isShowProfileEnabled = false
embedConfiguration.isDirectDeepLinkEnabled = false
GenuinSDK.shared.initializeEmbed(embedId: "YOUR_EMBED_ID", containerView: , viewConroller: , ssoToken: , embedConfiguration: embedConfiguration)
```
```swift ViewController.swift (Without SSO) theme={null}
let embedConfiguration = EmbedConfiguration()
embedConfiguration.isShowProfileEnabled = false
embedConfiguration.isDirectDeepLinkEnabled = false
GenuinSDK.shared.initializeEmbed(embedId: "YOUR_EMBED_ID", containerView: , viewConroller: , embedConfiguration: embedConfiguration)
```
```swift ViewController.swift (With Contextual Parameters) theme={null}
let embedConfiguration = EmbedConfiguration()
embedConfiguration.isShowProfileEnabled = false
embedConfiguration.isDirectDeepLinkEnabled = false
GenuinSDK.shared.initializeEmbed(embedId: "EMBED_ID", uniqueId: "YOUR_UNIQUE_ID", containerView: YOUR_VIEW, viewConroller: YOUR_VIEW_CONTROLLER, ssoToken: "YOUR_SSO_TOKEN", params: ["name" :"FULL_NAME", "nickname" : "USER_NAME", "mobile" :"MOBILE_NO"], contextualParams: ["page_context": "CONTEXT_TEXT", "geo": { "lat": LATITUDE_VALUE, "long": LONGITUDE_VALUE }], embedConfiguration: embedConfiguration)
```
**Note**: To fetch the Embed you need to add `YOUR_EMBED_ID`, `YOUR_CONTAINER_VIEW` in which you want the embed, and `YOUR_VIEW_CONTROLLER` containing your container view, while calling the below function. For auto login in the SDK, you shall pass "YOUR\_SSO\_TOKEN" in order to implement Embed with SSO in your app.
#### Approach 02
Initialize with Attributes During Creation
Create the `GenuinEmbedAttributes` first, then pass it directly while initializing the embed view:
```swift ViewController.swift theme={null}
// Below is an Example Code
let attributes = GenuinEmbedAttributes(embedId: YOUR_EMBED_ID, viewController: YOUR_VIEW_CONTROLLER)
let embedView = GenuinEmbedView(attributes: attributes)
self.YOUR_VIEW.addSubview(embedView)
embedView.fetchDataAndLoad()
```
#### Approach 03
Initialize First, Then Set Attributes
Create the embed view first and assign the attributes afterward:
```swift ViewController.swift theme={null}
// Below is an Example Code
let embedView = GenuinEmbedView()
let attributes = GenuinEmbedAttributes(embedId: YOUR_EMBED_ID, viewController: YOUR_VIEW_CONTROLLER)
embedView.initWith(attributes: attributes)
self.YOUR_VIEW.addSubview(embedView)
embedView.fetchDataAndLoad()
```
#### Approach 04
Adding the Embed View in a Storyboard
Steps:
1. When using **Interface Builder**, first create a wrapper view with your preferred height and constraints. This wrapper will serve as the container for the `GenuinEmbedView`.
2. Drag a `UIView` for embed and add it inside your wrapper view.
3. Set the embed view’s class to `GenuinEmbedView` in the Identity Inspector.
4. If a module for the specified class does not appear , then set the module as `GenuinCore` in the module field below the class.
5. Connect it to an `@IBOutlet` in your view controller (e.g., `embedView`).
6. Example: Initialize and Load with an Outlet
```swift ViewController.swift theme={null}
@IBOutlet weak var embedView: GenuinEmbedView?
func loadEmbed() {
//specify your attributes
let attributes = GenuinEmbedAttributes(embedId: YOUR_EMEBED_ID,
viewController: YOUR_VIEW_CONTROLLER)
embedView?.initWith(attributes: attributes)
embedView?.fetchDataAndLoad()
}
```
7. Call `loadEmbed()` to initialize and load the embed.
Check the additional information [here.](https://resources.begenuin.com/developers/sdk-docs/ios_sdk#additional-information)
### Full Screen Embed
```swift ViewController.swift (With SSO) theme={null}
let embedConfiguration = EmbedConfiguration()
embedConfiguration.isShowProfileEnabled = false
embedConfiguration.isDirectDeepLinkEnabled = false
GenuinSDK.shared.initializeEmbedFeed(embedId: "YOUR_EMBED_ID", containerView: , viewConroller: , ssoToken: , embedConfiguration: embedConfiguration)
```
```swift ViewController.swift (Without SSO) theme={null}
let embedConfiguration = EmbedConfiguration()
embedConfiguration.isShowProfileEnabled = false
embedConfiguration.isDirectDeepLinkEnabled = false
GenuinSDK.shared.initializeEmbedFeed(embedId: "YOUR_EMBED_ID", containerView: , viewConroller: , embedConfiguration: embedConfiguration)
```
```swift ViewController.swift (With Contextual Parameters) theme={null}
let embedConfiguration = EmbedConfiguration()
embedConfiguration.isShowProfileEnabled = false
embedConfiguration.isDirectDeepLinkEnabled = false
GenuinSDK.shared.initializeEmbedFeed(embedId: "EMBED_ID", uniqueId: "YOUR_UNIQUE_ID", containerView: YOUR_VIEW, viewConroller: YOUR_VIEW_CONTROLLER, ssoToken: "YOUR_SSO_TOKEN", params: ["name" :"FULL_NAME", "nickname" : "USER_NAME", "mobile" :"MOBILE_NO"], contextualParams: ["page_context": "CONTEXT_TEXT", "geo": { "lat": LATITUDE_VALUE, "long": LONGITUDE_VALUE }], embedConfiguration: embedConfiguration)
```
**Note**: To fetch the Embed you need to add `YOUR_EMBED_ID`, `YOUR_CONTAINER_VIEW` in which you want the embed, and `YOUR_VIEW_CONTROLLER` containing your container view, while calling the above function. For auto login in the SDK, you shall pass "YOUR\_SSO\_TOKEN" in order to implement Embed with SSO in your app.
### Standard Wall Embed
```swift StandardWallFeedViewController.swift theme={null}
import GenuinCore
class StandardWallFeedViewController: UIViewController {
override func viewDidLoad() {
super.viewDidLoad()
// Do any additional setup after loading the view.
let embedConfiguration = EmbedConfiguration()
embedConfiguration.isShowProfileEnabled = true
GenuinSDK.shared.initializeStandardWall(embedId: "YOUR_EMBED_ID", containerView: self.view, viewConroller: self, embedConfiguration: embedConfiguration)
}
}
```
```
GenuinSDK.shared.initializeStandardWall(embedId: "YOUR_EMBED_ID", containerView: self.view, viewConroller: self, ssoToken: "YOUR_SSO_TOKEN", params: ["name" :"FULL_NAME", "nickname" : "USER_NAME", "mobile" :"MOBILE_NO"], contextualParams: ["page_context": "CONTEXT_TEXT", "geo": { "lat": LATITUDE_VALUE, "long": LONGITUDE_VALUE }], embedConfiguration: embedConfiguration)
```
**Note**: To fetch the Embed you need to add `YOUR_EMBED_ID` while calling the above function.
## Embed with SwiftUI
### Carousel Embed
Refer to [Carousel View](https://resources.begenuin.com/developers/guides/embed#mobile-view) in Mobile
Genuin Carousel Embed View Wrapper
```swift Basic Embed theme={null}
import SwiftUI
import UIKit
import GenuinCore
struct GenuinCarouselViewWrapper: UIViewRepresentable {
var embedId: String
func makeUIView(context: Context) -> UIView {
let container = UIView()
return container
}
func updateUIView(_ uiView: UIView, context: Context) {
DispatchQueue.main.async {
guard let parentVC = uiView.parentViewController else {
print("Could not get parent VC!")
return
}
let embedConfiguration = EmbedConfiguration()
GenuinSDK.shared.initializeEmbed(
embedId: embedId,
containerView: uiView,
viewConroller: parentVC,
embedConfiguration: embedConfiguration
)
}
}
}
```
```swift Embed with Customization & SSO theme={null}
import SwiftUI
import UIKit
import GenuinCore
struct GenuinCarouselContextViewWrapper: UIViewRepresentable {
var embedId: String
var uniqueId: String?
var ssoToken: String?
var params: [String : Any]?
var contextualParams: [String: Any]?
var embedConfiguration: EmbedConfiguration = EmbedConfiguration()
func makeUIView(context: Context) -> UIView {
let container = UIView()
return container
}
func updateUIView(_ uiView: UIView, context: Context) {
DispatchQueue.main.async {
guard let parentVC = uiView.parentViewController else {
print("Could not get parent VC!")
return
}
GenuinSDK.shared.initializeEmbed(
embedId: embedId,
uniqueId: uniqueId,
containerView: uiView,
viewConroller: parentVC,
ssoToken: ssoToken,
params: params,
contextualParams: contextualParams,
embedConfiguration: embedConfiguration
)
}
}
}
```
Example Usage
```swift Basic Embed theme={null}
import SwiftUI
struct CarouselView: View {
var body: some View {
VStack {
GenuinCarouselViewWrapper(embedId: "YOUR_EMBED_ID")
.frame(height: 200)
Spacer()
}
}
}
#Preview {
CarouselView()
}
```
```swift Embed with Customization & SSO theme={null}
import SwiftUI
import UIKit
import GenuinCore
struct CarouselContextView: View {
@State private var contextualParams: [String: Any]? = nil
@State private var txtContext: String = ""
private var embedConfiguration: EmbedConfiguration = EmbedConfiguration()
init() {
let genuinCarouselConfiguration = GenuinCarouselConfiguration()
genuinCarouselConfiguration.aspectRatio = .ratio4x5
embedConfiguration.genuinCarouselConfiguration = genuinCarouselConfiguration
}
var body: some View {
VStack {
GenuinCarouselContextViewWrapper(embedId: "YOUR_EMBED_ID", uniqueId: "YOUR_UNIQUE_ID", ssoToken: "YOUR_SSO_TOKEN", params: ["name" :"FULL_NAME", "nickname" : "USER_NAME", "mobile" :"MOBILE_NO"], contextualParams: contextualParams, embedConfiguration: embedConfiguration)
.frame(height: 200)
HStack {
TextField("Contextual Params", text: $txtContext)
.textFieldStyle(.roundedBorder)
Button("Assign Context") {
contextualParams = ["page_context": txtContext, "geo" : [ "lat": LATITUDE_VALUE, "long": LONGITUDE_VALUE ]]
}
}
.padding()
Spacer()
}
}
}
#Preview {
CarouselContextView()
}
```
### Standard Wall Embed
Standard Wall View Wrapper
```swift Basic Embed theme={null}
import SwiftUI
import GenuinCore
struct GenuinSDKStandardWallNavigationControllerWrapper: UIViewControllerRepresentable {
var embedId: String
func makeUIViewController(context: Context) -> UINavigationController {
// Return the UIKit UINavigationController from the SDK
let embedConfiguration = EmbedConfiguration()
return GenuinSDK.shared.getStandardWallController(embedId: embedId, embedConfiguration: embedConfiguration) ?? UINavigationController()
}
func updateUIViewController(_ uiViewController: UINavigationController, context: Context) {
// No update logic needed unless the SDK content needs to change dynamically
}
}
```
Example Usage
```swift Basic Embed theme={null}
import SwiftUI
struct StandardWallView: View {
var body: some View {
GenuinSDKStandardWallNavigationControllerWrapper(embedId: "YOUR_EMBED_ID")
.edgesIgnoringSafeArea(.top)
}
}
#Preview {
StandardWallView()
}
```
**Note**: To fetch the Embed you need to add `YOUR_EMBED_ID` while calling the above function.
### Additional Information
To configure the `EmbedConfiguration` based on your need you can change the below values.
1. **isShowProfileEnabled** = This is an optional boolean parameter. Default value is false. If this parameter is true and also if user is logged in than Profile picture will be visible in full screen view (right side top corner). On clicking the profile picture user will see the account settings and logout options.
2. **isDirectDeepLinkEnabled** = This is an optional boolean parameter. Default value is false. If this parameter is true then all the interaction/clicks in the full screen view will redirect to the specific video in white labelled app associated with video and also value of this parameter "**interactionDeepLink**" will be ignored. If not passed then the regular flow will work.
3. **interactionDeepLink** = This is an optional parameter. You can pass a deeplink URL in this parameter. If a deeplink URL is given then all the interaction/clicks in the full screen view will redirect to the deeplink URL given. If not passed then the regular flow will work. It should be a correct URL else user will not be redirected.
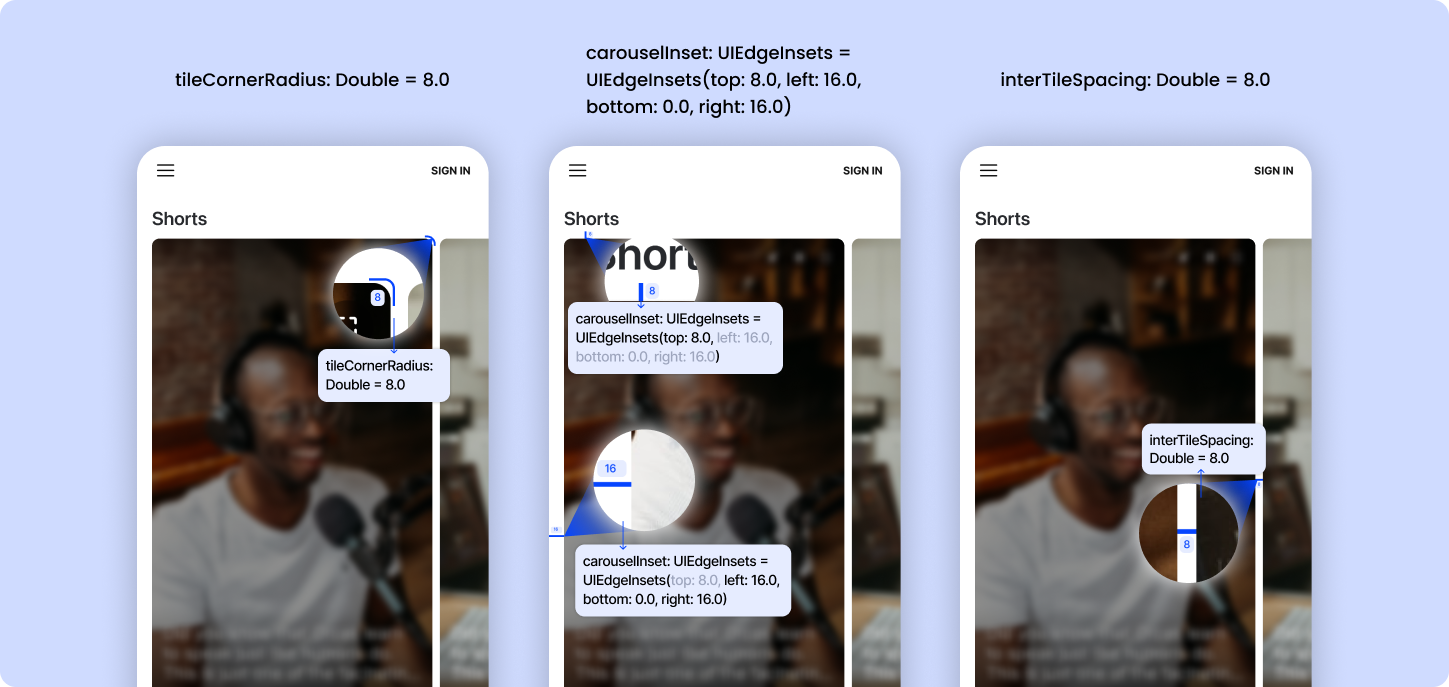
4. **genuinCarouselConfiguration** = This is an optional parameter. You can pass `GenuinCarouselConfiguration` object in this parameter. If `GenuinCarouselConfiguration` is provided then the carousel design will change accordingly. The default values are listed below, which you can pass in `GenuinCarouselConfiguration` object.
* `interTileSpacing` - spacing between the carousel's collection view items. It's default value is `8.0`
* `viewInset` - edge insets for carousel's collection view. It's default value is `UIEdgeInsets(top: 8.0, left: 16.0, bottom: 0.0, right: 16.0)`
* `tileCornerRadius` - cornerRadius for the carousel's collection view items. It's default value is `8.0`
 Below are the optional parameters for the `params` key:
1. **name** - This is an optional string parameter. Pass this parameter for '`signup/login`'.
2. **mobile** - This is an optional string parameter. Pass this parameter for `signup/login`.
3. **email** - This is an optional string parameter. Pass this parameter for `signup/login`.
4. **nickname** - This is an optional string parameter. If nickname is available in genuin ecosystem it will be used, else genuin will generate of its own.
5. **profile\_image**: This is an optional string parameter. Pass the `profile_image` parameter if you want to show the profile image in the SDK.
Below are the optional parameters for the `contextualParams` key:
1. **page\_context** - This is an optional string parameter. Pass this parameter for '`context`', so that feed could load based on that context.
2. **lat** - This is an optional float parameter. Pass this parameter in `geo` so that the feed could load based on the latitude and context.
3. **long** - This is an optional float parameter. Pass this parameter in `geo` so that the feed could load based on the longitude and context.
**Note**: `lat` and `long` both parameters shall be passed in order to implement the contextual feed based on the location.
**Example**
```swift SSO Example theme={null}
GenuinSDK.shared.initializeEmbed(embedId: "EMBED_ID", uniqueId: "YOUR_UNIQUE_ID", containerView: YOUR_VIEW, viewConroller: YOUR_VIEW_CONTROLLER, ssoToken: "YOUR_TOKEN", params: ["name" :"FULL_NAME", "nickname" : "USER_NAME", "mobile" :"MOBILE_NUMBER"], embedConfiguration: embedConfiguration)
```
```swift Contextual Example theme={null}
GenuinSDK.shared.initializeEmbed(embedId: "EMBED_ID", uniqueId: "YOUR_UNIQUE_ID", containerView: YOUR_VIEW, viewConroller: YOUR_VIEW_CONTROLLER, ssoToken: "YOUR_TOKEN", contextualParams: ["page_context": "CONTEXT_TEXT", "geo": { "lat": LATITUDE_VALUE, "long": LONGITUDE_VALUE }], embedConfiguration: embedConfiguration)
```
**Note**: You can pass above parameters in `GenuinEmbedAttributes` as well
## Placement with Swift
**Note**: Make sure you have followed the [installation steps](https://resources.begenuin.com/developers/sdk-docs/ios_sdk#installation) in order to implement the Carousel Embed.
**Note**: In order to migrate from GenuinSDK 1.0 to 2.0, you need to replace `import GenuinSDK` to `import GenuinCore` in your codebase.
GenuinPlacementAttributes
We have introduced new attribute `GenuinPlacementAttributes` which is used to hold all the necessary data for creating and initializing a placement view.
You can initialize it with the following parameters:
```swift ViewController.swift theme={null}
init(
placementId: String,
styleId: String,
uniqueId: String? = nil,
viewController: UIViewController,
ssoToken: String? = nil,
params: [String: Any]? = nil,
contextualParams: [String: Any]? = nil,
placementConfiguration: PlacementConfiguration = PlacementConfiguration()
)
```
Parameters
* `placementId: String` – Identifier for the placement.
* `styleId: String` – Identifier for the placement style.
* `uniqueId: String?` (optional) – Unique identifier for this placement instance.
* `viewController: UIViewController` – Parent view controller that will present the placement.
* `ssoToken: String?` (optional) – Single Sign-On token for authentication.
* `params: [String: Any]?` (optional) – Additional parameters to customize the placement.
* `contextualParams: [String: Any]?` (optional) – Context-specific parameters for the placement.
* `placementConfiguration: PlacementConfiguration` (optional) – Custom configuration object. Defaults to a new instance of PlacementConfiguration.
Creating and Loading an Placement
You can create and load a `GenuinPlacementView` in following ways:
#### Approach 01
Initialize placement
```swift ViewController.swift theme={null}
let placementConfiguration = PlacementConfiguration()
GenuinSDK.shared.initializePlacement(
placementId: "PLACEMENT_ID",
styleId: "STYLE_ID",
containerView: YOUR_CONTAINER_VIEW,
viewController: YOUR_CONTROLLER,
contextualParams: [
"page_context": "",
"geo": [
"lat": XX.XXX, // Float or Double
"long": XX.XXX, // Float or Double
"radius_limit": // Int
],
"place": [
"country": "",
"state": "",
"city": "",
"zipcode": // Int
],
"time": , // Long
"user_segments": [
"age": "",
"min_age": "",
"max_age": "",
"segment": "",
"gender": "M/F/O",
"race": ""
],
"url": "https://url/",
"brands_ids": [
brandId1, // Int
brandId2 // Int
],
"user_interests": [""],
"posted_by_user_ids": [
"user_id1",
"user_id2"
],
"previous_page_context": "",
"user_context": ""
],
placementConfiguration: placementConfiguration
)
```
#### Approach 02
Initialize with Attributes During Creation
Create the `GenuinPlacementAttributes` first, then pass it directly while initializing the placement view:
```swift ViewController.swift theme={null}
let attributes = GenuinPlacementAttributes(
placementId: "YOUR_PLACEMENT_ID",
styleId: "YOUR_PLACEMENT_STYLE_ID",
viewController: YOUR_VIEW_CONTROLLER
)
let placementView = GenuinPlacementView(attributes: attributes)
self.YOUR_VIEW.addSubview(placementView)
placementView.fetchDataAndLoad()
```
#### Approach 03
Initialize First, Then Set Attributes
Create the placement view first and assign the attributes afterward:
```swift ViewController.swift theme={null}
let placementView = GenuinPlacementView()
let attributes = GenuinPlacementAttributes(
placementId: "YOUR_PLACEMENT_ID",
styleId: "YOUR_PLACEMENT_STYLE_ID",
viewController: YOUR_VIEW_CONTROLLER
)
placementView.initWith(attributes: attributes)
self.YOUR_VIEW.addSubview(placementView)
placementView.fetchDataAndLoad()
```
#### Approach 04
Adding the Placement View in a Storyboard
Steps:
1. When using **Interface Builder**, first create a wrapper view with your preferred height and constraints. This wrapper will serve as the container for the `GenuinPlacementView`.
2. Drag a `UIView` for placement and add it inside your wrapper view.
3. Set the placement view’s class to `GenuinPlacementView` in the Identity Inspector.
4. If a module for the specified class does not appear , then set the module as `GenuinCore` in the module field below the class.
5. Connect it to an `@IBOutlet` in your view controller (e.g., `placementView`).
6. Example: Initialize and Load with an Outlet
```swift ViewController.swift theme={null}
@IBOutlet weak var placementView: GenuinPlacementView?
func loadPlacement() {
let attributes = GenuinPlacementAttributes(
placementId: "YOUR_PLACEMENT_ID",
styleId: "YOUR_PLACEMENT_STYLE_ID",
viewController: YOUR_VIEW_CONTROLLER
)
placementView?.initWith(attributes: attributes)
placementView?.fetchDataAndLoad()
}
```
7. Call `loadPlacement()` to initialize and load the placement.
## Loading Embed and Placement Views in the Background
You can fetch data for an embed or placement view in the background as per your requirement and add it to your view hierarchy once the data is ready.
### Example: Loading an Embed in the Background
```swift ViewController.swift theme={null}
let embedView = GenuinEmbedView()
let attributes = GenuinEmbedAttributes(
embedId: YOUR_EMBED_ID,
viewController: YOUR_VIEW_CONTROLLER
)
embedView.initWith(attributes: attributes)
embedView.fetchDataInBackground { success in
if success {
self.YOUR_VIEW.addSubview(embedView)
embedView.load()
}
}
```
### Example: Loading a Placement in the Background
```swift ViewController.swift theme={null}
let placementView = GenuinPlacementView()
let attributes = GenuinPlacementAttributes(
placementId: "YOUR_PLACEMENT_ID",
styleId: "YOUR_PLACEMENT_STYLE_ID",
viewController: YOUR_VIEW_CONTROLLER
)
placementView.initWith(attributes: attributes)
placementView.fetchDataInBackground { success in
if success {
self.YOUR_VIEW.addSubview(placementView)
placementView.load()
}
}
```
## Handle Login : via AutoLogin Approach
To Auto Login in the SDK, You need to call below method, whenever user is log in to your application.
**Note**: You don't need to call the below method if you have implemented the Embed With SSO already.
```swift ViewController.swift theme={null}
GenuinSDK.shared.ssoLogin(ssoToken: "YOUR_SSO_TOKEN")
```
**Handle AutoLogin in Embed**
```swift with embed theme={null}
GenuinSDK.shared.initializeEmbed(embedId: "EMBED_ID", uniqueId: "YOUR_UNIQUE_ID", containerView: YOUR_VIEW, viewConroller: YOUR_VIEW_CONTROLLER, ssoToken: "YOUR_SSO_TOKEN", params: ["name" :"FULL_NAME", "nickname" : "USER_NAME", "mobile" :"MOBILE_NO"], contextualParams: ["page_context": "CONTEXT_TEXT", "geo": { "lat": LATITUDE_VALUE, "long": LONGITUDE_VALUE }], embedConfiguration: embedConfiguration)
```
```swift withtout embed theme={null}
GenuinSDK.shared.ssoLogin(ssoToken: "YOUR_SSO_TOKEN", params: ["name" :"FULL_NAME", "nickname" : "USER_NAME"])
```
```swift with completion handler theme={null}
GenuinSDK.shared.ssoLogin(ssoToken: "YOUR_SSO_TOKEN") { status in
}
// Where status of login = true or false
```
## Custom Login
If you want to handle login process as per your requirement then follow the below steps:
**Step 1**: Assign Delegate while initializing Genuin SDK
```swift Swift theme={null}
GenuinSDK.shared.delegate = self ( YOUR_ANY_CLASS )
```
**Step 2**: Extend GenuinDelegate & Present your own controller on provided base controller
```swift Swift theme={null}
extension YOUR_ANY_CLASS : GenuinDelegate{
func presentLoginViewController(baseViewController : UIViewController) {
guard let loginVC = GET AND ASSIGN YOUR CONTROLLER
baseViewController.present(loginVC, animated: true)
}
}
```
**Step 3**: Must call below login service from Genuin, to keep user logged in, in Genuin SDK.
```swift Swift theme={null}
GenuinSDK.shared.ssoLogin(ssoToken: "YOUR_SSO_TOKEN", params: ["name" : "FULL_NAME", "nickname" : "USER_NAME"])
```
## Handle Logout : via AutoLogin Approach
Whenever user logs out from your application call the below method.
```swift ViewController.swift theme={null}
GenuinSDK.shared.ssoLogout()
```
```swift with completion handler theme={null}
GenuinSDK.shared.ssoLogout { status in
}
// Where status of logout = true or false
```
## Handling Deep Link
**Note**: Make sure you have followed the installation steps in order to handle the deep links.
**Prerequisite**:
1. Make sure you have white labelled your community by following these [steps](https://resources.begenuin.com/retail-media/build/how_to_white-label_your_community)
2. Enable Associated Domains in Certificates, Identifiers & Profiles using your Apple Developer account at [https://developer.apple.com/account/resources/identifiers/list](https://developer.apple.com/account/resources/identifiers/list)
3. Create apple-app-site-association (without extension) file with following settings:
```json apple-app-site-association theme={null}
{"appclips":{"apps":["YOUR_TEAM_ID.APP_BUNDLE_ID.Clip"]},"applinks":{"apps":[],"details":[{"paths":["/*"],"appID":"YOUR_TEAM_ID.APP_BUNDLE_ID"}]}}
```
Once the file is created, host it on the white labeled domain at `https://YOUR_WHITE-LABELLED_DOMAIN/.well-known/apple-app-site-association`
4. Add Associated Domains in capabilities if not already,
Below are the optional parameters for the `params` key:
1. **name** - This is an optional string parameter. Pass this parameter for '`signup/login`'.
2. **mobile** - This is an optional string parameter. Pass this parameter for `signup/login`.
3. **email** - This is an optional string parameter. Pass this parameter for `signup/login`.
4. **nickname** - This is an optional string parameter. If nickname is available in genuin ecosystem it will be used, else genuin will generate of its own.
5. **profile\_image**: This is an optional string parameter. Pass the `profile_image` parameter if you want to show the profile image in the SDK.
Below are the optional parameters for the `contextualParams` key:
1. **page\_context** - This is an optional string parameter. Pass this parameter for '`context`', so that feed could load based on that context.
2. **lat** - This is an optional float parameter. Pass this parameter in `geo` so that the feed could load based on the latitude and context.
3. **long** - This is an optional float parameter. Pass this parameter in `geo` so that the feed could load based on the longitude and context.
**Note**: `lat` and `long` both parameters shall be passed in order to implement the contextual feed based on the location.
**Example**
```swift SSO Example theme={null}
GenuinSDK.shared.initializeEmbed(embedId: "EMBED_ID", uniqueId: "YOUR_UNIQUE_ID", containerView: YOUR_VIEW, viewConroller: YOUR_VIEW_CONTROLLER, ssoToken: "YOUR_TOKEN", params: ["name" :"FULL_NAME", "nickname" : "USER_NAME", "mobile" :"MOBILE_NUMBER"], embedConfiguration: embedConfiguration)
```
```swift Contextual Example theme={null}
GenuinSDK.shared.initializeEmbed(embedId: "EMBED_ID", uniqueId: "YOUR_UNIQUE_ID", containerView: YOUR_VIEW, viewConroller: YOUR_VIEW_CONTROLLER, ssoToken: "YOUR_TOKEN", contextualParams: ["page_context": "CONTEXT_TEXT", "geo": { "lat": LATITUDE_VALUE, "long": LONGITUDE_VALUE }], embedConfiguration: embedConfiguration)
```
**Note**: You can pass above parameters in `GenuinEmbedAttributes` as well
## Placement with Swift
**Note**: Make sure you have followed the [installation steps](https://resources.begenuin.com/developers/sdk-docs/ios_sdk#installation) in order to implement the Carousel Embed.
**Note**: In order to migrate from GenuinSDK 1.0 to 2.0, you need to replace `import GenuinSDK` to `import GenuinCore` in your codebase.
GenuinPlacementAttributes
We have introduced new attribute `GenuinPlacementAttributes` which is used to hold all the necessary data for creating and initializing a placement view.
You can initialize it with the following parameters:
```swift ViewController.swift theme={null}
init(
placementId: String,
styleId: String,
uniqueId: String? = nil,
viewController: UIViewController,
ssoToken: String? = nil,
params: [String: Any]? = nil,
contextualParams: [String: Any]? = nil,
placementConfiguration: PlacementConfiguration = PlacementConfiguration()
)
```
Parameters
* `placementId: String` – Identifier for the placement.
* `styleId: String` – Identifier for the placement style.
* `uniqueId: String?` (optional) – Unique identifier for this placement instance.
* `viewController: UIViewController` – Parent view controller that will present the placement.
* `ssoToken: String?` (optional) – Single Sign-On token for authentication.
* `params: [String: Any]?` (optional) – Additional parameters to customize the placement.
* `contextualParams: [String: Any]?` (optional) – Context-specific parameters for the placement.
* `placementConfiguration: PlacementConfiguration` (optional) – Custom configuration object. Defaults to a new instance of PlacementConfiguration.
Creating and Loading an Placement
You can create and load a `GenuinPlacementView` in following ways:
#### Approach 01
Initialize placement
```swift ViewController.swift theme={null}
let placementConfiguration = PlacementConfiguration()
GenuinSDK.shared.initializePlacement(
placementId: "PLACEMENT_ID",
styleId: "STYLE_ID",
containerView: YOUR_CONTAINER_VIEW,
viewController: YOUR_CONTROLLER,
contextualParams: [
"page_context": "",
"geo": [
"lat": XX.XXX, // Float or Double
"long": XX.XXX, // Float or Double
"radius_limit": // Int
],
"place": [
"country": "",
"state": "",
"city": "",
"zipcode": // Int
],
"time": , // Long
"user_segments": [
"age": "",
"min_age": "",
"max_age": "",
"segment": "",
"gender": "M/F/O",
"race": ""
],
"url": "https://url/",
"brands_ids": [
brandId1, // Int
brandId2 // Int
],
"user_interests": [""],
"posted_by_user_ids": [
"user_id1",
"user_id2"
],
"previous_page_context": "",
"user_context": ""
],
placementConfiguration: placementConfiguration
)
```
#### Approach 02
Initialize with Attributes During Creation
Create the `GenuinPlacementAttributes` first, then pass it directly while initializing the placement view:
```swift ViewController.swift theme={null}
let attributes = GenuinPlacementAttributes(
placementId: "YOUR_PLACEMENT_ID",
styleId: "YOUR_PLACEMENT_STYLE_ID",
viewController: YOUR_VIEW_CONTROLLER
)
let placementView = GenuinPlacementView(attributes: attributes)
self.YOUR_VIEW.addSubview(placementView)
placementView.fetchDataAndLoad()
```
#### Approach 03
Initialize First, Then Set Attributes
Create the placement view first and assign the attributes afterward:
```swift ViewController.swift theme={null}
let placementView = GenuinPlacementView()
let attributes = GenuinPlacementAttributes(
placementId: "YOUR_PLACEMENT_ID",
styleId: "YOUR_PLACEMENT_STYLE_ID",
viewController: YOUR_VIEW_CONTROLLER
)
placementView.initWith(attributes: attributes)
self.YOUR_VIEW.addSubview(placementView)
placementView.fetchDataAndLoad()
```
#### Approach 04
Adding the Placement View in a Storyboard
Steps:
1. When using **Interface Builder**, first create a wrapper view with your preferred height and constraints. This wrapper will serve as the container for the `GenuinPlacementView`.
2. Drag a `UIView` for placement and add it inside your wrapper view.
3. Set the placement view’s class to `GenuinPlacementView` in the Identity Inspector.
4. If a module for the specified class does not appear , then set the module as `GenuinCore` in the module field below the class.
5. Connect it to an `@IBOutlet` in your view controller (e.g., `placementView`).
6. Example: Initialize and Load with an Outlet
```swift ViewController.swift theme={null}
@IBOutlet weak var placementView: GenuinPlacementView?
func loadPlacement() {
let attributes = GenuinPlacementAttributes(
placementId: "YOUR_PLACEMENT_ID",
styleId: "YOUR_PLACEMENT_STYLE_ID",
viewController: YOUR_VIEW_CONTROLLER
)
placementView?.initWith(attributes: attributes)
placementView?.fetchDataAndLoad()
}
```
7. Call `loadPlacement()` to initialize and load the placement.
## Loading Embed and Placement Views in the Background
You can fetch data for an embed or placement view in the background as per your requirement and add it to your view hierarchy once the data is ready.
### Example: Loading an Embed in the Background
```swift ViewController.swift theme={null}
let embedView = GenuinEmbedView()
let attributes = GenuinEmbedAttributes(
embedId: YOUR_EMBED_ID,
viewController: YOUR_VIEW_CONTROLLER
)
embedView.initWith(attributes: attributes)
embedView.fetchDataInBackground { success in
if success {
self.YOUR_VIEW.addSubview(embedView)
embedView.load()
}
}
```
### Example: Loading a Placement in the Background
```swift ViewController.swift theme={null}
let placementView = GenuinPlacementView()
let attributes = GenuinPlacementAttributes(
placementId: "YOUR_PLACEMENT_ID",
styleId: "YOUR_PLACEMENT_STYLE_ID",
viewController: YOUR_VIEW_CONTROLLER
)
placementView.initWith(attributes: attributes)
placementView.fetchDataInBackground { success in
if success {
self.YOUR_VIEW.addSubview(placementView)
placementView.load()
}
}
```
## Handle Login : via AutoLogin Approach
To Auto Login in the SDK, You need to call below method, whenever user is log in to your application.
**Note**: You don't need to call the below method if you have implemented the Embed With SSO already.
```swift ViewController.swift theme={null}
GenuinSDK.shared.ssoLogin(ssoToken: "YOUR_SSO_TOKEN")
```
**Handle AutoLogin in Embed**
```swift with embed theme={null}
GenuinSDK.shared.initializeEmbed(embedId: "EMBED_ID", uniqueId: "YOUR_UNIQUE_ID", containerView: YOUR_VIEW, viewConroller: YOUR_VIEW_CONTROLLER, ssoToken: "YOUR_SSO_TOKEN", params: ["name" :"FULL_NAME", "nickname" : "USER_NAME", "mobile" :"MOBILE_NO"], contextualParams: ["page_context": "CONTEXT_TEXT", "geo": { "lat": LATITUDE_VALUE, "long": LONGITUDE_VALUE }], embedConfiguration: embedConfiguration)
```
```swift withtout embed theme={null}
GenuinSDK.shared.ssoLogin(ssoToken: "YOUR_SSO_TOKEN", params: ["name" :"FULL_NAME", "nickname" : "USER_NAME"])
```
```swift with completion handler theme={null}
GenuinSDK.shared.ssoLogin(ssoToken: "YOUR_SSO_TOKEN") { status in
}
// Where status of login = true or false
```
## Custom Login
If you want to handle login process as per your requirement then follow the below steps:
**Step 1**: Assign Delegate while initializing Genuin SDK
```swift Swift theme={null}
GenuinSDK.shared.delegate = self ( YOUR_ANY_CLASS )
```
**Step 2**: Extend GenuinDelegate & Present your own controller on provided base controller
```swift Swift theme={null}
extension YOUR_ANY_CLASS : GenuinDelegate{
func presentLoginViewController(baseViewController : UIViewController) {
guard let loginVC = GET AND ASSIGN YOUR CONTROLLER
baseViewController.present(loginVC, animated: true)
}
}
```
**Step 3**: Must call below login service from Genuin, to keep user logged in, in Genuin SDK.
```swift Swift theme={null}
GenuinSDK.shared.ssoLogin(ssoToken: "YOUR_SSO_TOKEN", params: ["name" : "FULL_NAME", "nickname" : "USER_NAME"])
```
## Handle Logout : via AutoLogin Approach
Whenever user logs out from your application call the below method.
```swift ViewController.swift theme={null}
GenuinSDK.shared.ssoLogout()
```
```swift with completion handler theme={null}
GenuinSDK.shared.ssoLogout { status in
}
// Where status of logout = true or false
```
## Handling Deep Link
**Note**: Make sure you have followed the installation steps in order to handle the deep links.
**Prerequisite**:
1. Make sure you have white labelled your community by following these [steps](https://resources.begenuin.com/retail-media/build/how_to_white-label_your_community)
2. Enable Associated Domains in Certificates, Identifiers & Profiles using your Apple Developer account at [https://developer.apple.com/account/resources/identifiers/list](https://developer.apple.com/account/resources/identifiers/list)
3. Create apple-app-site-association (without extension) file with following settings:
```json apple-app-site-association theme={null}
{"appclips":{"apps":["YOUR_TEAM_ID.APP_BUNDLE_ID.Clip"]},"applinks":{"apps":[],"details":[{"paths":["/*"],"appID":"YOUR_TEAM_ID.APP_BUNDLE_ID"}]}}
```
Once the file is created, host it on the white labeled domain at `https://YOUR_WHITE-LABELLED_DOMAIN/.well-known/apple-app-site-association`
4. Add Associated Domains in capabilities if not already,
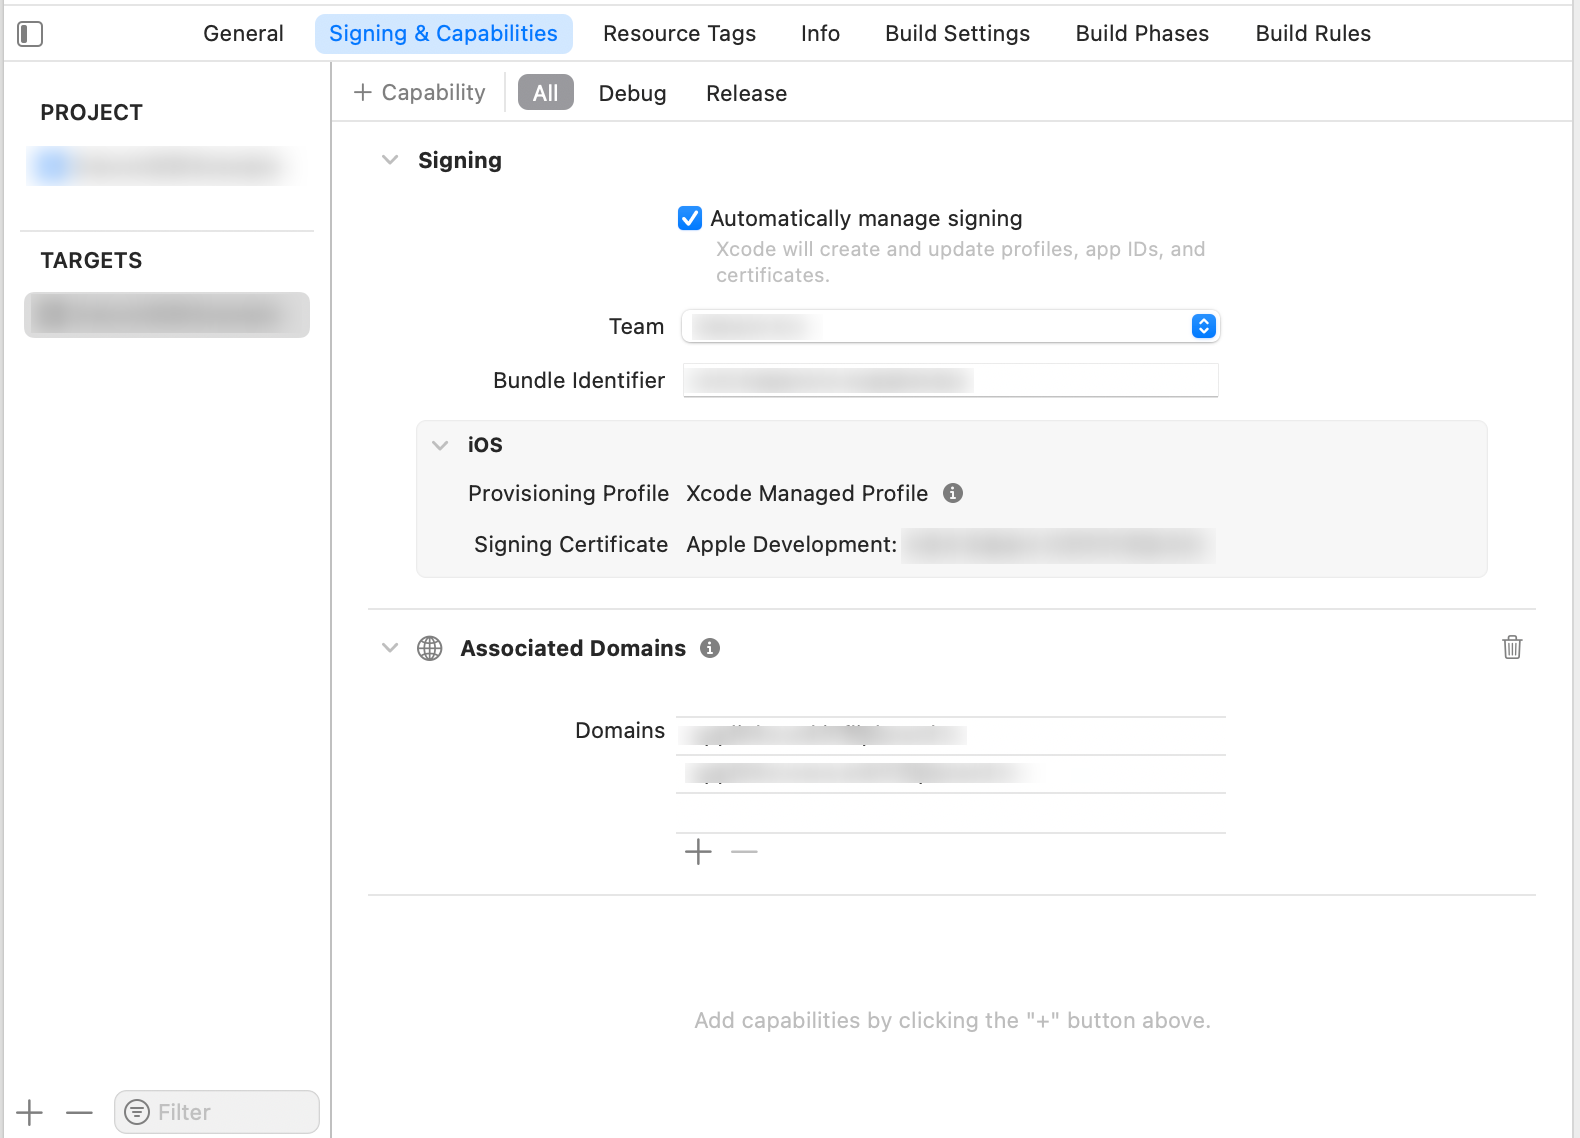 Add applinks in domains, for Example:
applinks: `YOUR_WHITE-LABELLED_DOMAIN`
applinks: `www.YOUR_WHITE-LABELLED_DOMAIN`
To handle deep links in your app use the following methods.
```swift SceneDelegate.swift theme={null}
class SceneDelegate: UIResponder, UIWindowSceneDelegate {
var window: UIWindow?
func scene(_ scene: UIScene, willConnectTo session: UISceneSession, options connectionOptions: UIScene.ConnectionOptions) {
// Use this method to optionally configure and attach the UIWindow `window` to the provided UIWindowScene `scene`.
// If using a storyboard, the `window` property will automatically be initialized and attached to the scene.
// This delegate does not imply the connecting scene or session are new (see `application:configurationForConnectingSceneSession` instead).
guard let _ = (scene as? UIWindowScene) else { return }
handleGenuinDeeplink(deeplinkURL: connectionOptions.userActivities.first?.webpageURL)
}
func scene(_ scene: UIScene, continue userActivity: NSUserActivity) {
//redirect if genuin SDK handles the deeplink
handleGenuinDeeplink(deeplinkURL: userActivity.webpageURL)
}
func handleGenuinDeeplink(deeplinkURL: URL?) {
if let dlURL = deeplinkURL, GenuinSDK.shared.willHandleDeepLink(url: dlURL){
if let rootVC = window?.rootViewController as? UIViewController{
DispatchQueue.main.async {
GenuinSDK.shared.handleDeeplink(viewController: rootVC)
}
}
}
}
}
```
```swift AppDelegate.swift theme={null}
func application(_ application: UIApplication, continue userActivity: NSUserActivity, restorationHandler: @escaping ([any UIUserActivityRestoring]?) -> Void) -> Bool {
//redirect if genuin SDK handles the deeplink
if let dlURL = userActivity.webpageURL , GenuinSDK.shared.willHandleDeepLink(url: dlURL){
if let rootVC = window?.rootViewController as? UIViewController {
GenuinSDK.shared.handleDeeplink(viewController: rootVC)
}
}
return true
}
```
**Note**: `GenuinSDK.shared.willHandleDeepLink(url: dlURL)` function will check whether `GenuinSDK` will handle the given deeplink or not. You can use it according to your deeplink redirection flow.
### Instructions for `SceneDelegate`:
Handle deep links using the root view controller by calling `GenuinSDK.shared.handleDeeplink(viewController: rootVC)`.
### Instructions for `AppDelegate`:
Use `GenuinSDK.shared.handleDeeplink(viewController: rootVC)` to manage the deep link using the app's root view controller.
**Note**:
1. To handle the Deeplink from another controller call the `GenuinSDK.shared.handleDeeplink(viewController: vc)` function from specific controller
2. If you are following the `SceneDelegate` method then calling this `GenuinSDK.shared.handleDeeplink(viewController: self)` function is mandatory
```swift theme={null}
override func viewDidAppear(_ animated: Bool) {
super.viewDidAppear(animated)
GenuinSDK.shared.handleDeeplink(viewController: self)
}
```
### Optional LinkOutInterceptor
If you want to intercept Linkout clicks, you can implement `GenuinLinkOutInterceptorDelegate` as below:
Step 1: Assign Delegate `GenuinLinkOutInterceptorDelegate`:
```swift YourClass.swift theme={null}
GenuinSDK.shared.registerLinkoutInterceptor(associateDomains: [ARRAY_OF_ASSOCIATED_DOMAINS_HANDLED_BY_YOUR_APP], linkOutInterceptorDelegate: YOUR_ANY_CLASS)
```
**Note**:
`ARRAY_OF_ASSOCIATED_DOMAINS_HANDLED_BY_YOUR_APP` accepts associcated domains supported by your apps. You can pass comma seperated domains like e.g. \["apple.com", "[https://apple.com](https://apple.com)", "[www.apple.com](http://www.apple.com)", "applinks:apple.com"]
`YOUR_ANY_CLASS` can be class which you want to handle the delegate method in.
Step 2: Handle callback method
```swift YourClass.swift theme={null}
extension YOUR_ANY_CLASS : GenuinLinkOutInterceptorDelegate{
func onLinkOutIntercept(urlString: String, viewController: UIViewController?) {
/*
This callback will be triggered when user clicks on linkouts from any video and if it's domain matches the associateDomains provided.
You will receive the url clicked and a current controller so you can handle the deeplink redirection from here in your app
*/
}
}
```
## Handling Push Notifications
### Using Firebase
1. Create an app in your firebase console by following [these steps](https://firebase.google.com/docs/cloud-messaging/ios/client)
2. Download the `GoogleService-Info.plist` file and add it in xcode project
3. Add pod in pod file
```swift podfile theme={null}
pod 'FirebaseMessaging', '~> 10.24.0'
```
4. To enable the push notifications functionality then enable the Push Notifications in your target. To do so, `Select the target > Signing & Capabilities > Add Capability of Push Notification`
5. Import
```swift Swift theme={null}
import FirebaseMessaging
import GenuinCore
```
AppDelegate
```swift AppDelegate.swift theme={null}
func application(_ application: UIApplication, didRegisterForRemoteNotificationsWithDeviceToken deviceToken: Data) {
//Assign APNS token and notify sdk
Messaging.messaging().apnsToken = deviceToken
GenuinSDK.shared.application(application, didRegisterForRemoteNotificationsWithDeviceToken: deviceToken, isFCMIntegrated: true)
}
```
**Note**: Pass `true` value in `isFCMIntegrated` parameter, as we are using the Firebase.
6. Initialize
SceneDelegate
```swift SceneDelegate.swift theme={null}
func scene(_ scene: UIScene, willConnectTo session: UISceneSession, options connectionOptions: UIScene.ConnectionOptions) {
guard let _ = (scene as? UIWindowScene) else { return }
//Register the notification
registerForNotification()
//configure firebase
FirebaseApp.configure()
//set delegate , extend current class with MessagingDelegate
Messaging.messaging().delegate = self
}
```
7. Place this code to take the user permission for Push Notification
```swift SceneDelegate.swift theme={null}
func registerForNotification(){
//Take permission and register remote notification
let current = UNUserNotificationCenter.current()
current.getNotificationSettings(completionHandler: { (settings) in
if settings.authorizationStatus == .notDetermined{
self.requestForNotificationPermission()
}else if settings.authorizationStatus == .authorized {
UNUserNotificationCenter.current().delegate = self
DispatchQueue.main.async{
UIApplication.shared.registerForRemoteNotifications()
}
}
})
}
private func requestForNotificationPermission(){
UNUserNotificationCenter.current().delegate = self
UNUserNotificationCenter.current().requestAuthorization(options:[.badge, .alert, .sound]){ (granted, error) in
print(granted)
}
UIApplication.shared.registerForRemoteNotifications()
}
```
8. Extend `MessagingDelegate` and Add follwing method:
```swift SceneDelegate.swift theme={null}
func messaging(_ messaging: Messaging, didReceiveRegistrationToken fcmToken: String?) {
if let token = fcmToken {
//fetch and register token
getInstanceID()
}
}
func getInstanceID(){
Messaging.messaging().token { token, error in
// Check for error. Otherwise do what you will with token here
if let error = error {
print("Error fetching remote instance ID: \(error)")
} else if let result = token {
print("Remote instance ID token: \(result)")
GenuinSDK.shared.registerFCMToken(token: result)
}
}
}
```
9. To Handle the Push Notification Redirection whenever the user taps, follow the below code
```swift SceneDelegate.swift theme={null}
func userNotificationCenter(_ center: UNUserNotificationCenter, didReceive response: UNNotificationResponse, withCompletionHandler completionHandler: @escaping () -> Void) {
if let userInfo = response.notification.request.content.userInfo as? [String: AnyObject]{
//notify firebase
Messaging.messaging().appDidReceiveMessage(userInfo)
//check if genuin will handle notification
if GenuinSDK.shared.willHandleNotification(userInfo: userInfo){
//notify to redirect
GenuinSDK.shared.userNotificationCenter(center, didReceive: response, withCompletionHandler: completionHandler)
//notification notification
if let rootVC = window?.rootViewController as? UIViewController{
GenuinSDK.shared.handleNotifications(viewController: rootVC)
}
}
}
}
```
**Note**: `GenuinSDK.shared.willHandleNotification(userInfo: userInfo)` function will check whether `GenuinSDK` will handle the given notification or not. You can use it according to your notification redirection flow.
10. To configure notification UI
```swift SceneDelegate.swift theme={null}
func userNotificationCenter(_ center: UNUserNotificationCenter, willPresent notification: UNNotification, withCompletionHandler completionHandler: @escaping (UNNotificationPresentationOptions) -> Void){
let userInfo = notification.request.content.userInfo
print("\(userInfo)")
//mention design type for notification
completionHandler([.list, .badge, .sound])
}
```
11. If you want to handle the notification when app is opened then follow the below code
```swift SceneDelegate.swift theme={null}
func userNotificationCenter(_ center: UNUserNotificationCenter, willPresent notification: UNNotification, withCompletionHandler completionHandler: @escaping (UNNotificationPresentationOptions) -> Void){
let userInfo = notification.request.content.userInfo
GenuinSDK.shared.userNotificationCenter(center, willPresent: notification, withCompletionHandler: completionHandler)
if let rootVC = window?.rootViewController as? UIViewController{
GenuinSDK.shared.handleNotifications(viewController: rootVC)
}
//mention design type for notification
completionHandler([.list, .badge, .sound])
}
```
**Note**: To handle the notification from another controller call the `GenuinSDK.shared.handleNotifications(viewController: YOUR_VIEW_CONTROLLER)` function
### Using APNS
1. To enable the push notifications functionality then enable the Push Notifications in your target. To do so, `Select the target > Signing & Capabilities > Add Capability of Push Notification`
2. Import
```swift Swift theme={null}
import GenuinCore
```
AppDelegate
```swift AppDelegate.swift theme={null}
func application(_ application: UIApplication, didRegisterForRemoteNotificationsWithDeviceToken deviceToken: Data) {
//Assign APNS token and notify sdk
GenuinSDK.shared.application(application, didRegisterForRemoteNotificationsWithDeviceToken: deviceToken, isFCMIntegrated: false)
}
```
**Note**: Pass `false` value in `isFCMIntegrated` parameter, as we are not using the Firebase.
SceneDelegate
Initialize
```swift SceneDelegate.swift theme={null}
func scene(_ scene: UIScene, willConnectTo session: UISceneSession, options connectionOptions: UIScene.ConnectionOptions) {
guard let _ = (scene as? UIWindowScene) else { return }
//Register the notification
registerForNotification()
}
```
3. Place this code to take the user permission for Push Notification
```swift SceneDelegate.swift theme={null}
func registerForNotification(){
//Take permission and register remote notification
let current = UNUserNotificationCenter.current()
current.getNotificationSettings(completionHandler: { (settings) in
if settings.authorizationStatus == .notDetermined{
self.requestForNotificationPermission()
}else if settings.authorizationStatus == .authorized {
UNUserNotificationCenter.current().delegate = self
DispatchQueue.main.async{
UIApplication.shared.registerForRemoteNotifications()
}
}
})
}
private func requestForNotificationPermission(){
UNUserNotificationCenter.current().delegate = self
UNUserNotificationCenter.current().requestAuthorization(options:[.badge, .alert, .sound]){ (granted, error) in
print(granted)
}
UIApplication.shared.registerForRemoteNotifications()
}
```
4. To Handle the Push Notification Redirection whenever the user taps, follow the below code
```swift SceneDelegate.swift theme={null}
func userNotificationCenter(_ center: UNUserNotificationCenter, didReceive response: UNNotificationResponse, withCompletionHandler completionHandler: @escaping () -> Void) {
if let userInfo = response.notification.request.content.userInfo as? [String: AnyObject]{
//check if genuin will handle notification
if GenuinSDK.shared.willHandleNotification(userInfo: userInfo){
//notify to redirect
GenuinSDK.shared.userNotificationCenter(center, didReceive: response, withCompletionHandler: completionHandler)
//notification notification
if let rootVC = window?.rootViewController as? UIViewController{
GenuinSDK.shared.handleNotifications(viewController: rootVC)
}
}
}
}
```
**Note**: `GenuinSDK.shared.willHandleNotification(userInfo: userInfo)` function will check whether `GenuinSDK` will handle the given notification or not. You can use it according to your notification redirection flow.
5. To configure notification UI
```swift SceneDelegate.swift theme={null}
func userNotificationCenter(_ center: UNUserNotificationCenter, willPresent notification: UNNotification, withCompletionHandler completionHandler: @escaping (UNNotificationPresentationOptions) -> Void){
let userInfo = notification.request.content.userInfo
print("\(userInfo)")
//mention design type for notification
completionHandler([.list, .badge, .sound])
}
```
6. If you want to handle the notification when app is opened then follow the below code
```swift SceneDelegate.swift theme={null}
func userNotificationCenter(_ center: UNUserNotificationCenter, willPresent notification: UNNotification, withCompletionHandler completionHandler: @escaping (UNNotificationPresentationOptions) -> Void){
let userInfo = notification.request.content.userInfo
GenuinSDK.shared.userNotificationCenter(center, willPresent: notification, withCompletionHandler: completionHandler)
if let rootVC = window?.rootViewController as? UIViewController{
GenuinSDK.shared.handleNotifications(viewController: rootVC)
}
//mention design type for notification
completionHandler([.list, .badge, .sound])
}
```
**Note**: To handle the notification from another controller call the `GenuinSDK.shared.handleNotifications(viewController: YOUR_VIEW_CONTROLLER)` function.
## What’s next?
Integrate Android SDK in Your ecosystem.
Integrate Web SDK in your ecosystem.
Integrate React Native SDK in your ecosystem.
## Support
If you need any assistance or have any questions, feel free to email us at [support@begenuin.com](mailto:support@begenuin.com).
Add applinks in domains, for Example:
applinks: `YOUR_WHITE-LABELLED_DOMAIN`
applinks: `www.YOUR_WHITE-LABELLED_DOMAIN`
To handle deep links in your app use the following methods.
```swift SceneDelegate.swift theme={null}
class SceneDelegate: UIResponder, UIWindowSceneDelegate {
var window: UIWindow?
func scene(_ scene: UIScene, willConnectTo session: UISceneSession, options connectionOptions: UIScene.ConnectionOptions) {
// Use this method to optionally configure and attach the UIWindow `window` to the provided UIWindowScene `scene`.
// If using a storyboard, the `window` property will automatically be initialized and attached to the scene.
// This delegate does not imply the connecting scene or session are new (see `application:configurationForConnectingSceneSession` instead).
guard let _ = (scene as? UIWindowScene) else { return }
handleGenuinDeeplink(deeplinkURL: connectionOptions.userActivities.first?.webpageURL)
}
func scene(_ scene: UIScene, continue userActivity: NSUserActivity) {
//redirect if genuin SDK handles the deeplink
handleGenuinDeeplink(deeplinkURL: userActivity.webpageURL)
}
func handleGenuinDeeplink(deeplinkURL: URL?) {
if let dlURL = deeplinkURL, GenuinSDK.shared.willHandleDeepLink(url: dlURL){
if let rootVC = window?.rootViewController as? UIViewController{
DispatchQueue.main.async {
GenuinSDK.shared.handleDeeplink(viewController: rootVC)
}
}
}
}
}
```
```swift AppDelegate.swift theme={null}
func application(_ application: UIApplication, continue userActivity: NSUserActivity, restorationHandler: @escaping ([any UIUserActivityRestoring]?) -> Void) -> Bool {
//redirect if genuin SDK handles the deeplink
if let dlURL = userActivity.webpageURL , GenuinSDK.shared.willHandleDeepLink(url: dlURL){
if let rootVC = window?.rootViewController as? UIViewController {
GenuinSDK.shared.handleDeeplink(viewController: rootVC)
}
}
return true
}
```
**Note**: `GenuinSDK.shared.willHandleDeepLink(url: dlURL)` function will check whether `GenuinSDK` will handle the given deeplink or not. You can use it according to your deeplink redirection flow.
### Instructions for `SceneDelegate`:
Handle deep links using the root view controller by calling `GenuinSDK.shared.handleDeeplink(viewController: rootVC)`.
### Instructions for `AppDelegate`:
Use `GenuinSDK.shared.handleDeeplink(viewController: rootVC)` to manage the deep link using the app's root view controller.
**Note**:
1. To handle the Deeplink from another controller call the `GenuinSDK.shared.handleDeeplink(viewController: vc)` function from specific controller
2. If you are following the `SceneDelegate` method then calling this `GenuinSDK.shared.handleDeeplink(viewController: self)` function is mandatory
```swift theme={null}
override func viewDidAppear(_ animated: Bool) {
super.viewDidAppear(animated)
GenuinSDK.shared.handleDeeplink(viewController: self)
}
```
### Optional LinkOutInterceptor
If you want to intercept Linkout clicks, you can implement `GenuinLinkOutInterceptorDelegate` as below:
Step 1: Assign Delegate `GenuinLinkOutInterceptorDelegate`:
```swift YourClass.swift theme={null}
GenuinSDK.shared.registerLinkoutInterceptor(associateDomains: [ARRAY_OF_ASSOCIATED_DOMAINS_HANDLED_BY_YOUR_APP], linkOutInterceptorDelegate: YOUR_ANY_CLASS)
```
**Note**:
`ARRAY_OF_ASSOCIATED_DOMAINS_HANDLED_BY_YOUR_APP` accepts associcated domains supported by your apps. You can pass comma seperated domains like e.g. \["apple.com", "[https://apple.com](https://apple.com)", "[www.apple.com](http://www.apple.com)", "applinks:apple.com"]
`YOUR_ANY_CLASS` can be class which you want to handle the delegate method in.
Step 2: Handle callback method
```swift YourClass.swift theme={null}
extension YOUR_ANY_CLASS : GenuinLinkOutInterceptorDelegate{
func onLinkOutIntercept(urlString: String, viewController: UIViewController?) {
/*
This callback will be triggered when user clicks on linkouts from any video and if it's domain matches the associateDomains provided.
You will receive the url clicked and a current controller so you can handle the deeplink redirection from here in your app
*/
}
}
```
## Handling Push Notifications
### Using Firebase
1. Create an app in your firebase console by following [these steps](https://firebase.google.com/docs/cloud-messaging/ios/client)
2. Download the `GoogleService-Info.plist` file and add it in xcode project
3. Add pod in pod file
```swift podfile theme={null}
pod 'FirebaseMessaging', '~> 10.24.0'
```
4. To enable the push notifications functionality then enable the Push Notifications in your target. To do so, `Select the target > Signing & Capabilities > Add Capability of Push Notification`
5. Import
```swift Swift theme={null}
import FirebaseMessaging
import GenuinCore
```
AppDelegate
```swift AppDelegate.swift theme={null}
func application(_ application: UIApplication, didRegisterForRemoteNotificationsWithDeviceToken deviceToken: Data) {
//Assign APNS token and notify sdk
Messaging.messaging().apnsToken = deviceToken
GenuinSDK.shared.application(application, didRegisterForRemoteNotificationsWithDeviceToken: deviceToken, isFCMIntegrated: true)
}
```
**Note**: Pass `true` value in `isFCMIntegrated` parameter, as we are using the Firebase.
6. Initialize
SceneDelegate
```swift SceneDelegate.swift theme={null}
func scene(_ scene: UIScene, willConnectTo session: UISceneSession, options connectionOptions: UIScene.ConnectionOptions) {
guard let _ = (scene as? UIWindowScene) else { return }
//Register the notification
registerForNotification()
//configure firebase
FirebaseApp.configure()
//set delegate , extend current class with MessagingDelegate
Messaging.messaging().delegate = self
}
```
7. Place this code to take the user permission for Push Notification
```swift SceneDelegate.swift theme={null}
func registerForNotification(){
//Take permission and register remote notification
let current = UNUserNotificationCenter.current()
current.getNotificationSettings(completionHandler: { (settings) in
if settings.authorizationStatus == .notDetermined{
self.requestForNotificationPermission()
}else if settings.authorizationStatus == .authorized {
UNUserNotificationCenter.current().delegate = self
DispatchQueue.main.async{
UIApplication.shared.registerForRemoteNotifications()
}
}
})
}
private func requestForNotificationPermission(){
UNUserNotificationCenter.current().delegate = self
UNUserNotificationCenter.current().requestAuthorization(options:[.badge, .alert, .sound]){ (granted, error) in
print(granted)
}
UIApplication.shared.registerForRemoteNotifications()
}
```
8. Extend `MessagingDelegate` and Add follwing method:
```swift SceneDelegate.swift theme={null}
func messaging(_ messaging: Messaging, didReceiveRegistrationToken fcmToken: String?) {
if let token = fcmToken {
//fetch and register token
getInstanceID()
}
}
func getInstanceID(){
Messaging.messaging().token { token, error in
// Check for error. Otherwise do what you will with token here
if let error = error {
print("Error fetching remote instance ID: \(error)")
} else if let result = token {
print("Remote instance ID token: \(result)")
GenuinSDK.shared.registerFCMToken(token: result)
}
}
}
```
9. To Handle the Push Notification Redirection whenever the user taps, follow the below code
```swift SceneDelegate.swift theme={null}
func userNotificationCenter(_ center: UNUserNotificationCenter, didReceive response: UNNotificationResponse, withCompletionHandler completionHandler: @escaping () -> Void) {
if let userInfo = response.notification.request.content.userInfo as? [String: AnyObject]{
//notify firebase
Messaging.messaging().appDidReceiveMessage(userInfo)
//check if genuin will handle notification
if GenuinSDK.shared.willHandleNotification(userInfo: userInfo){
//notify to redirect
GenuinSDK.shared.userNotificationCenter(center, didReceive: response, withCompletionHandler: completionHandler)
//notification notification
if let rootVC = window?.rootViewController as? UIViewController{
GenuinSDK.shared.handleNotifications(viewController: rootVC)
}
}
}
}
```
**Note**: `GenuinSDK.shared.willHandleNotification(userInfo: userInfo)` function will check whether `GenuinSDK` will handle the given notification or not. You can use it according to your notification redirection flow.
10. To configure notification UI
```swift SceneDelegate.swift theme={null}
func userNotificationCenter(_ center: UNUserNotificationCenter, willPresent notification: UNNotification, withCompletionHandler completionHandler: @escaping (UNNotificationPresentationOptions) -> Void){
let userInfo = notification.request.content.userInfo
print("\(userInfo)")
//mention design type for notification
completionHandler([.list, .badge, .sound])
}
```
11. If you want to handle the notification when app is opened then follow the below code
```swift SceneDelegate.swift theme={null}
func userNotificationCenter(_ center: UNUserNotificationCenter, willPresent notification: UNNotification, withCompletionHandler completionHandler: @escaping (UNNotificationPresentationOptions) -> Void){
let userInfo = notification.request.content.userInfo
GenuinSDK.shared.userNotificationCenter(center, willPresent: notification, withCompletionHandler: completionHandler)
if let rootVC = window?.rootViewController as? UIViewController{
GenuinSDK.shared.handleNotifications(viewController: rootVC)
}
//mention design type for notification
completionHandler([.list, .badge, .sound])
}
```
**Note**: To handle the notification from another controller call the `GenuinSDK.shared.handleNotifications(viewController: YOUR_VIEW_CONTROLLER)` function
### Using APNS
1. To enable the push notifications functionality then enable the Push Notifications in your target. To do so, `Select the target > Signing & Capabilities > Add Capability of Push Notification`
2. Import
```swift Swift theme={null}
import GenuinCore
```
AppDelegate
```swift AppDelegate.swift theme={null}
func application(_ application: UIApplication, didRegisterForRemoteNotificationsWithDeviceToken deviceToken: Data) {
//Assign APNS token and notify sdk
GenuinSDK.shared.application(application, didRegisterForRemoteNotificationsWithDeviceToken: deviceToken, isFCMIntegrated: false)
}
```
**Note**: Pass `false` value in `isFCMIntegrated` parameter, as we are not using the Firebase.
SceneDelegate
Initialize
```swift SceneDelegate.swift theme={null}
func scene(_ scene: UIScene, willConnectTo session: UISceneSession, options connectionOptions: UIScene.ConnectionOptions) {
guard let _ = (scene as? UIWindowScene) else { return }
//Register the notification
registerForNotification()
}
```
3. Place this code to take the user permission for Push Notification
```swift SceneDelegate.swift theme={null}
func registerForNotification(){
//Take permission and register remote notification
let current = UNUserNotificationCenter.current()
current.getNotificationSettings(completionHandler: { (settings) in
if settings.authorizationStatus == .notDetermined{
self.requestForNotificationPermission()
}else if settings.authorizationStatus == .authorized {
UNUserNotificationCenter.current().delegate = self
DispatchQueue.main.async{
UIApplication.shared.registerForRemoteNotifications()
}
}
})
}
private func requestForNotificationPermission(){
UNUserNotificationCenter.current().delegate = self
UNUserNotificationCenter.current().requestAuthorization(options:[.badge, .alert, .sound]){ (granted, error) in
print(granted)
}
UIApplication.shared.registerForRemoteNotifications()
}
```
4. To Handle the Push Notification Redirection whenever the user taps, follow the below code
```swift SceneDelegate.swift theme={null}
func userNotificationCenter(_ center: UNUserNotificationCenter, didReceive response: UNNotificationResponse, withCompletionHandler completionHandler: @escaping () -> Void) {
if let userInfo = response.notification.request.content.userInfo as? [String: AnyObject]{
//check if genuin will handle notification
if GenuinSDK.shared.willHandleNotification(userInfo: userInfo){
//notify to redirect
GenuinSDK.shared.userNotificationCenter(center, didReceive: response, withCompletionHandler: completionHandler)
//notification notification
if let rootVC = window?.rootViewController as? UIViewController{
GenuinSDK.shared.handleNotifications(viewController: rootVC)
}
}
}
}
```
**Note**: `GenuinSDK.shared.willHandleNotification(userInfo: userInfo)` function will check whether `GenuinSDK` will handle the given notification or not. You can use it according to your notification redirection flow.
5. To configure notification UI
```swift SceneDelegate.swift theme={null}
func userNotificationCenter(_ center: UNUserNotificationCenter, willPresent notification: UNNotification, withCompletionHandler completionHandler: @escaping (UNNotificationPresentationOptions) -> Void){
let userInfo = notification.request.content.userInfo
print("\(userInfo)")
//mention design type for notification
completionHandler([.list, .badge, .sound])
}
```
6. If you want to handle the notification when app is opened then follow the below code
```swift SceneDelegate.swift theme={null}
func userNotificationCenter(_ center: UNUserNotificationCenter, willPresent notification: UNNotification, withCompletionHandler completionHandler: @escaping (UNNotificationPresentationOptions) -> Void){
let userInfo = notification.request.content.userInfo
GenuinSDK.shared.userNotificationCenter(center, willPresent: notification, withCompletionHandler: completionHandler)
if let rootVC = window?.rootViewController as? UIViewController{
GenuinSDK.shared.handleNotifications(viewController: rootVC)
}
//mention design type for notification
completionHandler([.list, .badge, .sound])
}
```
**Note**: To handle the notification from another controller call the `GenuinSDK.shared.handleNotifications(viewController: YOUR_VIEW_CONTROLLER)` function.
## What’s next?
Integrate Android SDK in Your ecosystem.
Integrate Web SDK in your ecosystem.
Integrate React Native SDK in your ecosystem.
## Support
If you need any assistance or have any questions, feel free to email us at [support@begenuin.com](mailto:support@begenuin.com).